Installing a sauna in your garage isn’t just about buying a kit and plugging it in. After going through this process myself, I discovered there are some seriously tricky problems that most guides completely skip over. This isn’t your typical weekend project – it’s about dealing with crazy weather swings, electrical interference, and creating a wellness space that doesn’t turn your garage into a disaster zone.
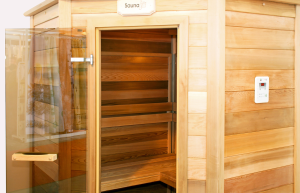
According to Nordvik Outdoors, you need at least 24–35 sq ft of free space for a functional garage sauna installation, which represents a significant portion of most single-car garages and requires careful space planning to maintain vehicle access.
Table of Contents
- The Weather Problems Nobody Warns You About
- Building It Without Breaking Everything
- Creating a Complete Wellness Setup
- Dealing with Building Codes and Inspectors
- DIY vs Professional Installation: The Real Story
- Making the Most of Limited Space
TL;DR
- Garage saunas deal with crazy weather problems that are totally different from indoor or outdoor installations
- All that electrical stuff in your garage can mess with your sauna heater’s performance
- You need special joints and barriers to prevent your garage from cracking and breaking
- Smart planning can turn your garage into a complete wellness center
- Building codes for garage saunas are still evolving – plan ahead now
- Most DIY projects take 3-4 times longer than expected because of garage-specific problems
- Keeping your car storage while adding a sauna takes serious planning
The Weather Problems Nobody Warns You About
Your garage isn’t just an empty box waiting for a sauna – it’s basically a weather system that has its own attitude. I learned this the hard way when my first attempt turned into a disaster because I thought, “Hey, it’s indoors, how hard can it be?”
Spoiler alert: garages are weird. They’re connected to your house but act like they’re outside. They get crazy hot in summer and freezing in winter, and somehow manage to be humid when you don’t want them to be. My first winter taught me that putting a sauna in your garage is like trying to have a spa day in a moody teenager’s bedroom.
Understanding the fundamentals of proper moisture and heat management is crucial before attempting any garage installation. The principles outlined in dry vs wet sauna science become even more critical when dealing with the unique environmental challenges that garage spaces present.
The Garage Humidity Nightmare
Here’s what nobody tells you: your garage is basically a moisture highway. All those walls it shares with your house? They’re not just holding things up – they’re like little rivers carrying humidity exactly where you don’t want it. I found this out when my car started getting rained on… inside my garage.
During my first winter, I’m enjoying a nice 180°F sauna session, feeling all zen and relaxed. Then I step out to find water literally dripping off my garage door onto my car. Turns out, when you blast hot, steamy air against a freezing cold garage door, physics happens. And physics is a jerk.
The temperature difference between my toasty sauna and that 25°F garage door created what I now call “the indoor rain system.” Not only was my car getting soaked, but I was creating ice patches on the floor that turned my garage into a skating rink. My wife was… let’s just say “not amused” when she slipped getting out of her car.
How I Fixed the Winter Water Problem
I had to become a moisture detective. The solution wasn’t pretty or cheap, but it worked. I installed what the fancy people call “variable permeability membranes” – basically smart plastic that breathes when it needs to and seals when it doesn’t. Sounds high-tech, but really it’s just creating walls that can handle mood swings.
My Winter Survival Checklist (learned the hard way):
- Vapor barriers on anything that touches the outside world
- Garage door seals that actually work (not the cheap stuff)
- Thermal curtains to separate the sauna area from the arctic wasteland
- Humidity sensors because guessing doesn’t work
- A drainage system for when things go wrong (and they will)
- Testing everything when it’s really, really cold outside
Summer Hot Air Problems
Just when I thought I had it figured out, summer hit. When your garage is already 85°F, trying to heat a sauna becomes like trying to boil water on a stove that’s already hot – it just doesn’t work right. I was losing 40% of my heating efficiency because hot air rises, and my garage was already full of hot air.
I ended up installing exhaust fans that turn on automatically, but figuring out when and how fast took months of sweating my butt off in an inefficient sauna. Pro tip: start with the ventilation system, not the sauna itself.
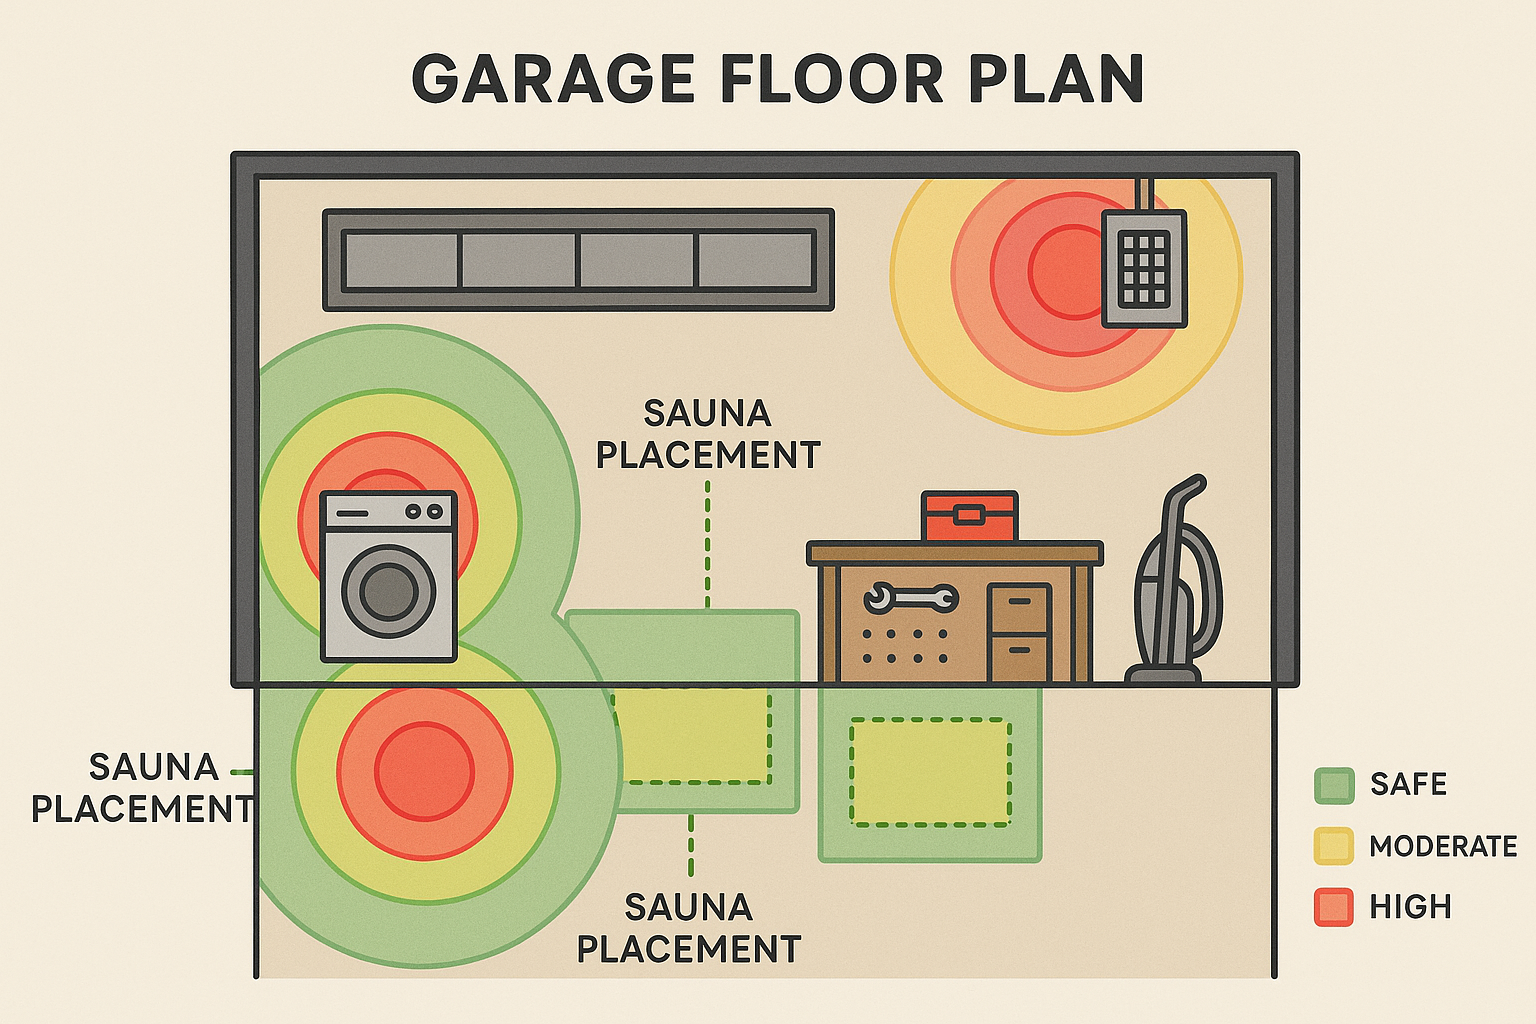
The Electrical Interference Nobody Mentions
Here’s something that’ll drive you crazy: all that electrical stuff in your garage can mess with your sauna heater. I’m talking about your breaker panel, car charger, garage door opener – basically everything that uses electricity. I kept getting hot and cold spots in my sauna and couldn’t figure out why until I started measuring the electrical interference.
Research from Garage Gym Athlete shows that traditional saunas require temperatures between 170-195°F for optimal health benefits, but electromagnetic interference can create temperature variations of 10-15°F within the same sauna space, significantly impacting the therapeutic effectiveness.
Creating an Electrical Peace Zone
The solution? Keep your sauna heater at least 8 feet away from anything electrical, and wrap power lines with special materials that block interference. This sounds like overkill until you’re sitting in a sauna that’s 180°F on one side and 165°F on the other. Trust me, it matters.
Grounding Without Electrocuting Yourself
I had to connect my sauna’s electrical system to my garage’s existing setup without creating dangerous feedback loops. This is one of those “sounds simple, is actually terrifying” situations. I ended up hiring an electrician for this part because the internet is full of horror stories about DIY electrical work gone wrong.
Building It Without Breaking Everything
Most people think putting a sauna in their garage is just about framing some walls and plugging in a heater. Nope. Your garage expands and contracts like it’s breathing, and if you don’t account for that, things break. Expensive things.
A recent story from Columbus Monthly featured Kate Borges, who “built her first ice plunge in the summer of 2021” and transformed her garage into a complete wellness center with sauna, hot tub, and massage studio, demonstrating how garage spaces can successfully accommodate comprehensive wellness installations when properly engineered.
When planning your structural approach, it’s worth studying outdoor sauna design principles since garage installations share many of the same environmental challenges as outdoor units, particularly regarding moisture management and thermal cycling.
Dealing with Temperature Swings
My garage goes from 15°F in winter to 110°F in summer. That’s a 95-degree swing that makes everything expand and contract like it’s doing yoga. My first attempt cracked along the foundation because I built it like it was going in my living room. Lesson learned: garages move, and your sauna needs to move with them.
I had to install special joints and flexible connections that let everything expand and contract without breaking. It’s like building with rubber bands, but more expensive.
Stopping Heat from Escaping Through the Floor
I put foam barriers between my sauna floor and the concrete garage floor. Without this, heat just pours out through the floor, and you get cold spots that’ll ruin your whole experience. It’s a small detail that makes a huge difference – the kind of thing you don’t think about until you’re sitting on a cold bench wondering why you spent all this money.
| Where Heat Escapes | How Much You Lose | How I Fixed It | What It Cost Me |
|---|---|---|---|
| Floor touching concrete | 15-25°F | Foam barrier | $300 |
| Walls touching foundation | 10-20°F | Thermal breaks | $450 |
| Ceiling near garage door | 20-30°F | Insulated curtains | $600 |
| Electrical holes | 5-15°F | Sealed everything | $225 |
Making It Work as Both Sauna and Garage
My wife made it crystal clear: “This sauna better not mess with parking my car.” That constraint forced me to get creative about space sharing. I needed a sauna that could basically disappear when we needed the garage to be a garage.
The Transformer Garage Solution
I installed ceiling-mounted folding walls using heavy-duty hardware (think boat equipment – it has to handle moisture and temperature swings). Now I can fully enclose my sauna area when I want to sweat, and fold everything back up when we need to park both cars or work on projects.
The hardware cost me $800, but it was worth every penny to avoid sleeping on the couch. Plus, having a garage that can transform from workshop to wellness center is actually pretty cool.
The Warm-Up Zone
I installed radiant floor heating in a 4-foot area around the sauna entrance. This prevents the shock of going from 70°F garage air to 180°F sauna heat, and it actually saves energy by pre-warming the air that gets pulled into the sauna. It’s one of those details that makes everything work better.
Creating a Complete Wellness Setup
Why stop at just a sauna? Once I started thinking about it, I realized my garage could become a complete recovery center. I designed a circuit that includes hot therapy, cold therapy, stretching space, and a transition area – all while leaving room to park the car.
My 12-Foot Recovery Circuit
I created a flow that guides you through a complete session: 6×8 sauna in the corner, 4×4 cold plunge using the existing floor drain, stretching area with wall-mounted equipment, and a transition zone with towel warming and water. The whole thing flows naturally and still leaves 60% of the garage for parking.
The therapeutic benefits of alternating between hot and cold become even more pronounced in a garage setting. Understanding sauna and cold therapy principles is essential for designing an effective recovery circuit that maximizes the health benefits of your garage wellness space.
The Cold Plunge Setup
My garage already had a floor drain (most do), so I just tapped into it for the cold plunge overflow. This saved me thousands in plumbing costs and made the installation way simpler than I expected. Sometimes the best solutions are the obvious ones.
The floor drain was already there – I just had to tap into it for my cold plunge overflow. This saved me thousands in plumbing costs and made the installation much simpler than I expected.
Keeping Exercise Noise Away from Zen Time
I used sound-dampening materials to prevent workout noise from ruining sauna meditation. Nothing kills a peaceful sweat session like someone deadlifting 10 feet away. The acoustic separation was worth the extra cost.
Smart Automation That Actually Works
I connected my sauna controls to the existing garage automation (door openers, security cameras, etc.). This wasn’t about being fancy – it was about making the system actually usable without having to think about it.
My garage already had smart systems, so adding sauna automation was straightforward. Now the sauna pre-heats based on my calendar, weather, and usage patterns. It sounds high-tech, but really it just means my sauna is ready when I am, and I’m not wasting energy heating it when I’m not home.
Recent reviews from Garage Gym Reviews highlight how modern saunas feature “mobile app that functions as a control panel, so temperature settings, timer settings, and other features are all at your fingertips,” demonstrating the growing integration of smart technology in garage wellness installations.
Dealing with Building Codes and Inspectors
Here’s something nobody warns you about: building inspectors often haven’t seen garage saunas before. My inspector spent two hours asking questions and making me explain everything. I ended up educating him more than he was inspecting me.
The key is being prepared with documentation that addresses every possible concern. I created a packet that covered electrical loads, ventilation plans, structural considerations, fire safety, and moisture management. Over-preparing saved me multiple trips and re-inspections.
My Permit Application Survival Kit
What I Wish I’d Known to Include:
- Electrical calculations (including existing garage loads)
- Ventilation plans with actual airflow numbers
- Structural drawings showing load distribution
- Fire safety plans and emergency exits
- Moisture control specifications
- Professional engineer approval (if needed)
- Insurance company notification
- Manufacturer certifications
- Safety protocols and emergency procedures
Building Your Expert Team
I found contractors who had done garage saunas before. My electrician had installed three others in the area, and his experience saved me weeks of back-and-forth with the inspector. Having people who can answer technical questions confidently makes the whole process smoother.
The electrical contractor I found had done three other garage saunas in my area. His experience saved me weeks of back-and-forth with the inspector and prevented costly mistakes I would have made on my own.
DIY vs Professional Installation: The Real Story
I thought I could handle this myself. I have construction experience, I’m handy, and how hard could it be? Turns out, sauna construction involves specialized knowledge I didn’t have, and the electrical requirements alone made me reconsider my approach.
According to Nordvik Outdoors, traditional electric sauna heaters require 240V circuits and professional wiring, while infrared models work with standard 110V outlets, representing a significant cost and complexity difference that can impact your DIY versus professional installation decision.
Before making the DIY versus professional decision, it’s crucial to understand what constitutes authentic sauna design. The insights from Finnish sauna design principles can help you evaluate whether DIY approaches will deliver the authentic experience you’re seeking or if professional installation is necessary to achieve proper functionality.
The Electrical Reality Check
My garage’s 100-amp service was already maxed out with the car charger and workshop equipment. Adding a sauna meant upgrading to 200-amp service, which immediately added $3,500 to my budget. This is the kind of surprise that can kill a project if you’re not prepared.
I had to honestly assess whether I could handle:
- Electrical load calculations
- 240V wiring installation
- Vapor barrier installation
- HVAC ventilation design
- Code compliance documentation
| DIY Approach | Time Investment | Skills Needed | Total Cost | Risk Level |
|---|---|---|---|---|
| Build Everything Myself | 60-120 hours | Advanced everything | $8,000-15,000 | High |
| Assemble a Kit | 20-40 hours | Basic electrical | $5,000-12,000 | Medium |
| Hire for Complex Stuff | 30-60 hours | Assembly skills | $12,000-20,000 | Low |
| Full Professional | 10-20 hours | Writing checks | $18,000-35,000 | Very Low |
My garage’s 100-amp service was already maxed out with the electric car charger and workshop equipment. Adding a garage sauna meant upgrading to 200-amp service, which immediately added $3,500 to my budget.
The Moisture Management Fear Factor
Improper vapor barrier installation leads to hidden mold growth within two years. This scared me more than the electrical work because mold remediation can cost more than the entire sauna project. I decided to hire professionals for this critical phase.
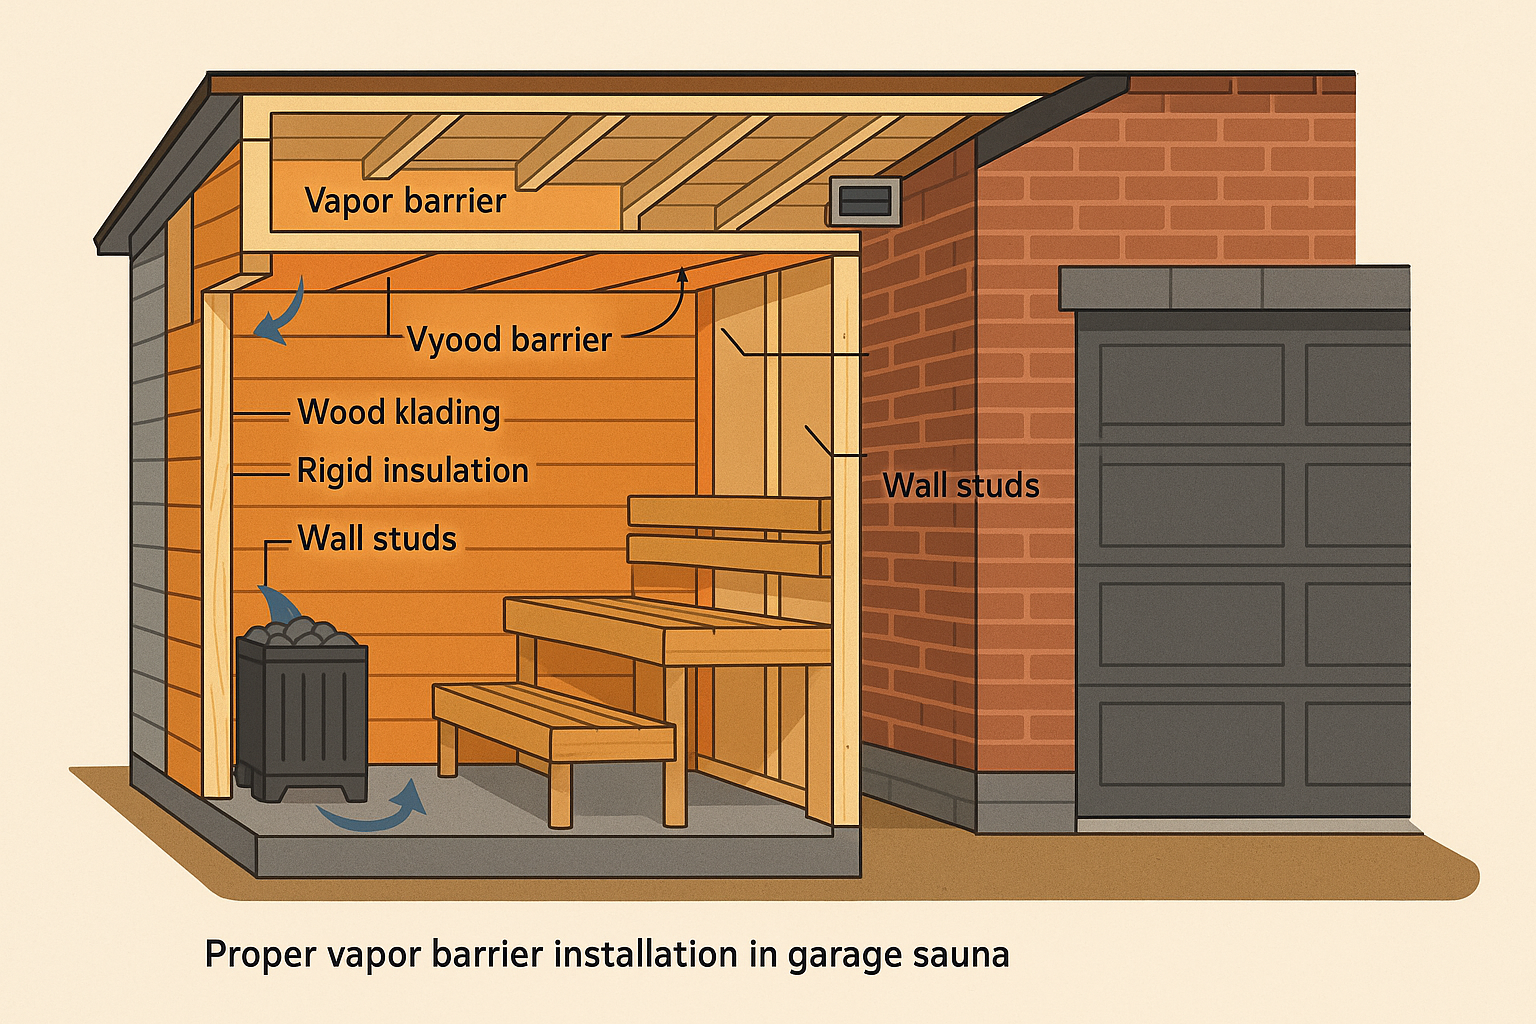
The vapor barrier work scared me more than the electrical. One mistake and I’d have mold problems that could cost tens of thousands to remediate. I decided to hire professionals for this critical phase.
Why Everything Takes Longer Than Expected
My project took three times longer than I planned because of garage-specific complications that standard guides don’t mention. Working in a space that needs to remain functional while under construction adds layers of difficulty.
Every weekend became a puzzle: how do I make progress while still being able to park the car and access stored items? This constraint significantly slowed my work pace and added frustration I hadn’t anticipated.
Weather-Dependent Construction
Many installation steps require the garage door to be open for extended periods. Try doing precision work in 20°F weather with the door open – it’s miserable and slow. I had to plan construction phases around weather and garage usage patterns.
Winter construction proved nearly impossible. Working with the garage door open in 20°F weather made progress painfully slow and uncomfortable.
The Inspection Cascade Problem
Garage saunas often require multiple inspections (electrical, plumbing, building) at different phases. Each inspection can require modifications that affect previously completed work. The electrical inspection made me relocate my heater, which meant redoing framing I’d already finished. These cascading changes are common but rarely discussed.
The electrical inspection revealed code violations that required me to relocate my heater placement, which meant redoing framing work I’d already completed. These cascading changes are common but rarely discussed in DIY guides.
Making the Most of Limited Space
The biggest challenge was maintaining vehicle storage while adding wellness capabilities. This required creative space planning that standard sauna designs don’t address. I had to preserve parking, maintain access to seasonal equipment, and create a functional wellness space in the same footprint.
Establishing proper habits and routines is essential for maximizing your garage sauna investment. The structured approach outlined in sauna routine methodology becomes even more important when your sauna shares space with other garage functions, requiring disciplined scheduling and preparation protocols.
The Parking Puzzle
I used cardboard mockups to figure out how cars actually move in and out of the garage. Sounds silly, but it saved me from making expensive mistakes. I discovered that my wife’s SUV needed 18 inches more door clearance than my sedan, and my initial corner placement would have forced her to park outside all winter.
Real-World Usage Testing
The cardboard mockup revealed usage patterns I’d never noticed. My son always dumps his hockey bag in the same corner, my wife needs extra space to unload groceries, and I tend to pull in crooked when I’m tired. These real-world constraints shaped my final design more than any theoretical space planning.
I discovered that my wife’s SUV required 18 inches more clearance than my sedan when opening doors in the garage. By creating a cardboard mockup of our sauna placement, I realized my initial corner location would force her to park outside during winter months. This led me to redesign the sauna as a peninsula configuration that preserved door clearances while actually improving the wellness circuit flow.
The mockup process revealed usage patterns I never noticed. My teenage son always throws his hockey bag in the same corner, and my wife needs extra space to unload groceries. These real-world constraints shaped my final design more than any theoretical space planning.
Going Vertical for Storage
The ceiling above my indoor sauna became a perfect location for seasonal storage that’s rarely accessed. I built custom platforms that integrate with the sauna structure while providing secure storage for holiday decorations and camping gear.
The ceiling above my indoor sauna in garage became perfect storage for stuff I rarely need. I built custom platforms that integrate with the sauna structure while providing secure storage for holiday decorations and camping gear. It actually improved my garage’s organization.
Creating Functional Zones
I reorganized my entire garage around how we actually use it, not how I thought we should use it. This meant creating dedicated areas for different activities that complement rather than compete with the sauna.
My Zone System That Actually Works
Zone 1: Car Stuff (30% of space)
- Primary parking with room to open doors
- Basic maintenance tools within reach
- Emergency equipment easily accessible
Zone 2: Wellness Area (25% of space)
- Sauna with transition space
- Recovery equipment storage
- Towel and water stations
Zone 3: Seasonal Storage (20% of space)
- Overhead systems for rotating equipment
- Climate-controlled sections for sensitive items
- Easy access during changeover periods
Zone 4: Daily Use Storage (15% of space)
- Tools and supplies we actually use
- Lawn care equipment
- Sports gear that gets used regularly
Zone 5: Utility Area (10% of space)
- Electrical panels and connections
- HVAC equipment
- Shutoffs and controls
The zoning approach eliminated the chaos that previously made my garage unusable. Now everything has a designated location that supports both vehicle storage and sauna in the garage operations.
Creating dedicated zones for different activities meant I could optimize each area for its specific function. The wellness zone features non-slip flooring and drainage, while the automotive zone has oil-resistant surfaces and tool accessibility.
This zoning eliminated the chaos that made my garage unusable. Now everything has a home, and the sauna fits naturally into the flow instead of disrupting it.
Creating dedicated zones meant I could optimize each area for its specific function. The wellness zone has non-slip flooring and drainage, while the automotive zone has oil-resistant surfaces and tool accessibility. It sounds organized because it actually is.
When I was struggling with some of these complex challenges, I discovered that HETKI Sauna’s Finnish-engineered systems actually solve many of the garage-specific problems I encountered through trial and error. Their pre-engineered approach eliminates much of the guesswork around ventilation, electrical requirements, and thermal management that can make DIY garage installations so challenging.
What impressed me most was how their modular systems are designed for outdoor conditions, which means they already handle the moisture management and temperature cycling issues that are essential for garage environments. If you’re feeling overwhelmed by the complexity of creating a proper garage sauna installation, their planning tools and authentic Finnish design approach might save you from the expensive learning process I went through.
What I’d Tell My Past Self
If I could go back and do this again, here’s what I’d do differently:
Start with the electrical. Don’t even think about sauna placement until you know your electrical capacity and upgrade costs. This determines everything else.
Budget 50% more than you think. Between the electrical upgrade, unexpected moisture issues, and all the little things that add up, my final cost was way higher than my initial estimate.
Plan for winter testing. Install everything in fall so you can test it during the worst conditions. Summer problems are annoying; winter problems can be dangerous.
Hire professionals for moisture management. This is not the place to save money. One mistake leads to mold problems that cost more than the entire project.
Mock up everything with cardboard first. Seriously. It feels silly but prevents expensive mistakes.
Think about resale value. Even if you plan to stay forever, build it in a way that adds value rather than creating a weird custom setup that future buyers won’t understand.
Installing a sauna in your garage is absolutely doable, but it’s way more complex than most guides suggest. The key is understanding that you’re not just adding a sauna – you’re creating a multi-functional space that needs to work for wellness, vehicle storage, and everything else you do in your garage.
The investment in time, money, and effort pays off in daily use and long-term property value. My garage went from being a cluttered storage space to being the most-used room in our house for health and wellness activities. My family uses it almost daily, and it’s become the neighborhood gathering spot for post-workout recovery sessions.
The best part? It actually made my garage more organized and functional overall. Sometimes the constraint of adding something new forces you to optimize everything else, and that’s exactly what happened here.