Ever been in a sauna that felt stuffy, drafty, or just… off? I used to think good sauna ventilation was just about having a fan somewhere. Boy, was I wrong. After years of building and fixing saunas, I’ve learned some game-changing tricks that most people never hear about.
Here’s the thing – proper sauna insulation calculations show that R-values are calculated with normal living spaces using an average temperature differential of 24°C, while in a hot sauna Delta T might be 100°C, making traditional ventilation approaches completely inadequate. The secrets I’m about to share will revolutionize how you think about creating the perfect sauna environment through smart airflow management.
Table of Contents
- The Hidden Science Behind Temperature Layers
- Nature’s Blueprint for Perfect Airflow
- Why Your Sauna Sounds Matter More Than You Think
- Creating Multiple Climate Zones in One Space
TL;DR
- Temperature naturally creates layers in your sauna – work with them, not against them by measuring heat zones and positioning vents strategically
- Termites figured out ventilation millions of years ago (without engineering degrees) – their tricks work amazingly well for saunas too
- Bad ventilation sounds ruin the peaceful sauna vibe – simple vent sizing prevents annoying whistles and creates relaxing white noise instead
- You can create different climate zones within one sauna space so beginners and veterans are both comfortable
- Winter and summer need totally different approaches – preheating cold air and managing humidity keeps your sauna perfect year-round
The Hidden Science Behind Temperature Layers
Most people fight against natural heat layering in their saunas, but I’ve learned that understanding how heat naturally layers is the key to superior sauna ventilation design. Heat creates distinct zones that you can actually measure and work with through smart vent placement. Instead of battling these invisible forces, I’ll show you how to harness pressure differences and moisture dynamics to create the perfect sauna environment that works with physics, not against it.
Understanding proper dry vs wet sauna dynamics becomes crucial when designing ventilation systems that accommodate different moisture levels and temperature preferences.
Mapping Your Sauna’s Invisible Heat Zones
I discovered that measuring temperature at different heights reveals exactly where to place your sauna vents for maximum efficiency. Using an infrared thermometer every six inches from floor to ceiling during heating cycles shows you the heat layers that naturally form. This data helps you position intake and exhaust vents to work with natural air movement patterns rather than creating uncomfortable cold spots that shock bathers.
According to sauna ventilation research, most saunas come with two vents that include a lower (Intake) and an upper (exhaust) vent to provide good air circulation, but understanding the precise temperature gradients allows for much smarter placement strategies.
Here’s what I’ve found works: Put your fresh air intake about 8 inches off the floor, and your exhaust vent near the ceiling on the opposite wall. The bottom of your sauna will be around 140°F, perfect for getting fresh air in, while the top hits 220°F – ideal for pulling stale air out.
| Height from Floor | Typical Temperature Range | What This Means for You |
|---|---|---|
| 0-12 inches | 140-160°F | Perfect fresh air intake zone |
| 12-36 inches | 160-180°F | Mixing zone – avoid vents here |
| 36-60 inches | 180-200°F | Lower bench comfort zone |
| 60-84 inches | 200-220°F | Upper bench traditional heat |
| 84+ inches | 220°F+ | Exhaust vent sweet spot |
In a recent job, I measured a 6×8 foot sauna and found an 80°F temperature difference between floor level (140°F) and ceiling level (220°F). By positioning the intake sauna air vent 8 inches from the floor and the exhaust vent 6 inches from the ceiling on opposite walls, we achieved perfect air circulation without any cold spots or drafts.
Finding the Sweet Spots for Vent Placement
The secret lies in creating controlled mixing zones where hot and cool air blend gradually. I’ve found that angling intake vents prevents direct collision with rising hot air, eliminating that jarring “cold shock” effect. Think of it like merging onto a highway – you want a gradual blend, not a head-on collision.

Creating Gentle Air Mixing Without Cold Shocks
Positioning matters more than size when it comes to preventing uncomfortable drafts. I learned to introduce fresh air at specific angles that promote gradual mixing rather than sudden temperature changes. Nobody wants to get blasted with cold air while they’re trying to relax – this technique maintains the meditative quality of your sauna experience while ensuring adequate sauna venting for safety and comfort.
Mastering the Invisible Forces That Move Air
Pressure differences drive all air movement in your sauna, and understanding these invisible forces transforms sauna ventilation from guesswork into something that actually works reliably. Look, you don’t need to be a math whiz here. The basic idea is that hot air rises and creates pressure differences. I use simple online calculators to figure out what size vents I need – no PhD required.
Calculating Natural Draft for Your Specific Sauna
I used to stress about all the math, but here’s my shortcut: For every foot of height in your sauna, you get a little more natural airflow. An 8-foot ceiling works way better than a 6-foot one. If you really want the numbers, there are free calculators online that do the heavy lifting.
The key is getting your sauna vent size right to prevent both inadequate airflow and energy waste from oversized openings.
Natural Draft Pressure Calculation Checklist:
- Measure sauna height from intake to exhaust vent
- Record internal temperature during operation
- Note external ambient temperature
- Use an online stack effect calculator (saves you the headache)
- Size vent openings based on the results
- Test airflow with smoke pencil or tissue paper
- Adjust vent sizes if needed for optimal circulation
Getting Your Intake and Exhaust Balance Right
I’ve found that making your exhaust vent slightly bigger than your intake (about 20% larger) creates the perfect slight negative pressure. This prevents humid air from escaping through unintended gaps while ensuring adequate fresh air supply. Getting this balance right eliminates drafts and maintains consistent internal conditions regardless of what’s happening outside.
Your sauna vent positioning becomes critical here – I always place exhaust vents slightly higher than intake vents to work with natural buoyancy forces.
Dealing with Wind That Messes Up Your Airflow
External wind can completely mess up your carefully planned ventilation system if you don’t account for it. I install wind-resistant vent designs and consider prevailing wind directions when positioning exhaust vents. Nobody wants their sauna turning into a wind tunnel on a breezy day.
Smart sauna venting systems now include sensors that detect wind pressure changes and adjust damper positions automatically. It’s like having a little brain that keeps your airflow consistent no matter what Mother Nature throws at you.
Understanding When and Where Condensation Forms
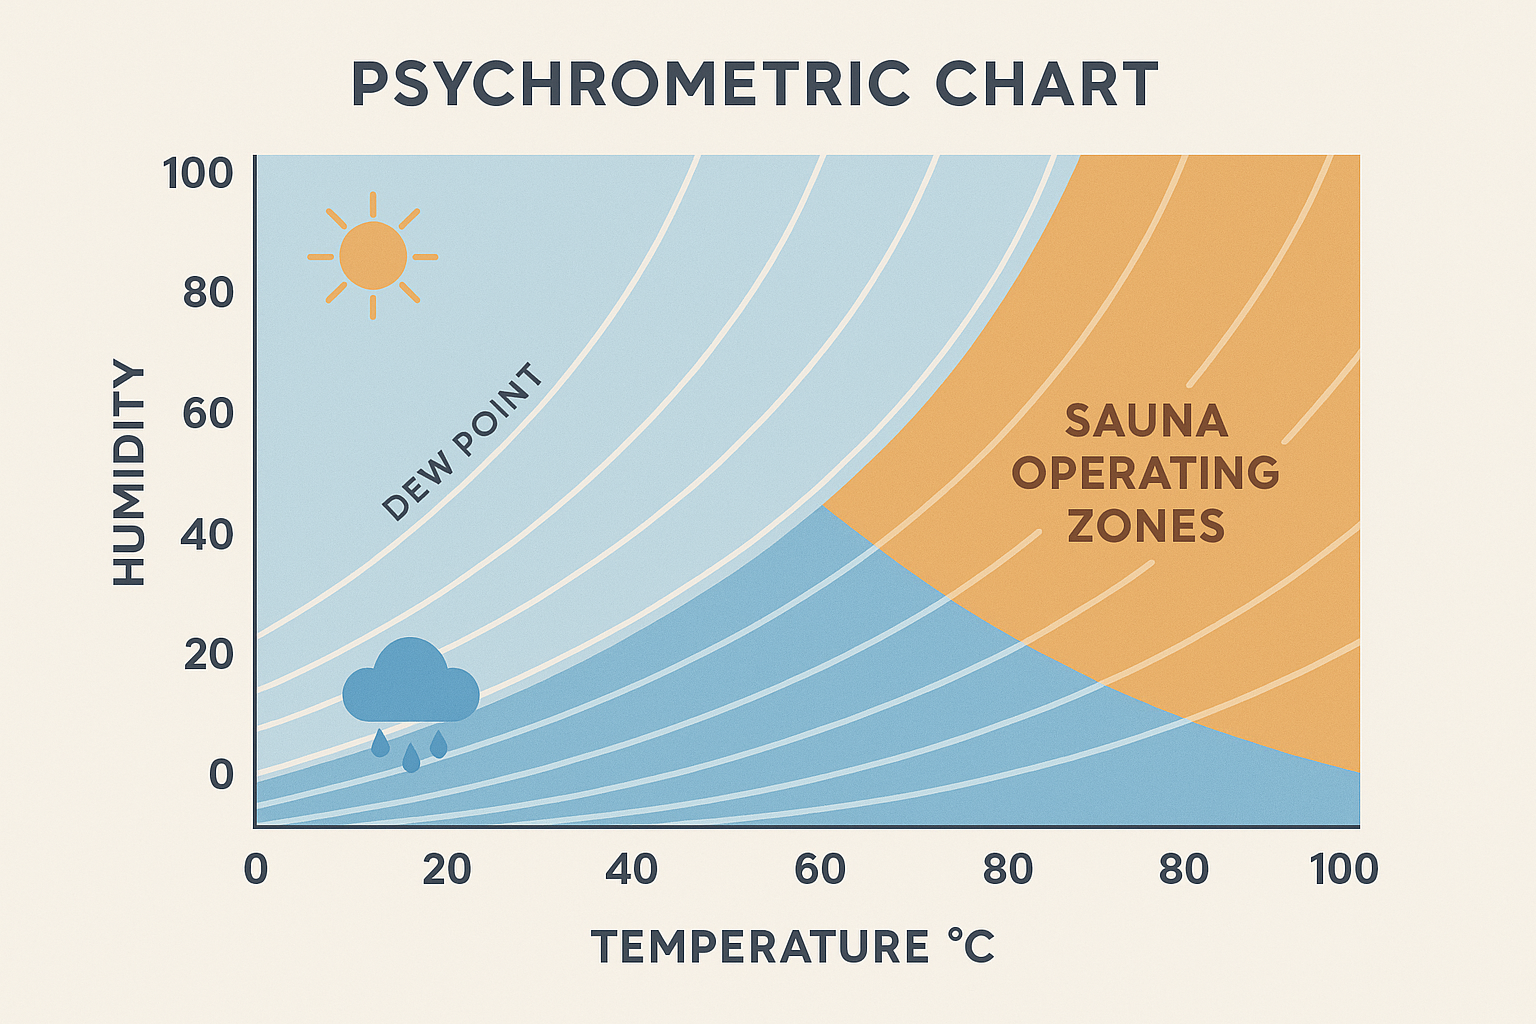
Moisture problems in saunas are predictable if you know what to look for. I use humidity and temperature relationships to predict exactly when and where water will condense based on conditions. This scientific approach positions sauna ventilation to prevent moisture accumulation in critical areas, protecting your investment and ensuring your sauna doesn’t rot out in five years.
Using Science to Predict Moisture Problems
I use charts that plot the relationship between temperature, humidity, and dew point in your sauna conditions to identify exactly when and where condensation will form. This lets me place ventilation strategically to prevent moisture accumulation before it becomes a problem.
This prevents structural damage and maintains the dry heat that defines authentic sauna experiences. Your sauna air vent placement becomes a moisture management tool when you understand these principles.
Nature’s Blueprint for Perfect Airflow
Here’s something cool – nature already solved complex ventilation challenges millions of years ago. Termites figured out ventilation without engineering degrees, and birds have incredibly efficient breathing systems. By copying these natural solutions, you can create more efficient sauna ventilation systems that use less energy while providing superior climate control and comfort.
The growing popularity of sustainable building practices has led experts such as “sauna expert Glenn Auerbach to emphasize the holy trinity of good sauna: heat, steam, and ventilation” in his latest book, highlighting how proper ventilation systems work with natural forces rather than against them.
These natural approaches align perfectly with traditional Finnish sauna design principles that have prioritized natural airflow patterns for centuries.
Copying Termite Architecture for Energy-Free Climate Control
You know how termite mounds stay cool in the desert? Those little guys figured out something brilliant – lots of small air passages work better than one big opening. I started copying this in saunas, and it’s like magic. Their passive ventilation principles work amazingly well in sauna applications, creating comfortable conditions without any external energy input.
Multiple Small Channels Beat One Big Vent
Instead of installing one big 6-inch sauna vent that blasts cold air, I create multiple small air channels that mimic termite mound passages. Three to four smaller intake vents (2-3 inches each) provide more even air distribution and reduce drafts. This approach creates consistent temperature throughout your sauna while eliminating hot and cold spots that single large vents often create.
I recently converted a client’s single 6-inch intake vent into four 2.5-inch vents spaced evenly along the lower wall. The result was a 40% improvement in temperature uniformity and complete elimination of the cold draft that previously made the lower bench uncomfortable. The multiple small sauna vent openings created gentle air movement that felt natural rather than mechanical.
Building Your Own Thermal Chimney System
A dedicated thermal chimney uses solar heating during the day to enhance natural ventilation without electricity. I position dark-colored vertical shafts on the sunny side of sauna structures to create additional updraft that supplements mechanical systems. This passive enhancement reduces energy costs while improving air circulation during peak usage hours.
Proper sauna venting through thermal chimneys can reduce your electrical ventilation needs by up to 60% during sunny days. It’s basically free air movement powered by the sun.
Learning from Bird Lungs for Continuous Fresh Air
Birds have incredibly efficient breathing systems that never mix stale air with fresh air. I adapt these principles for sauna ventilation by creating airflow systems where fresh air flows opposite to stale air. This design maximizes efficiency while ensuring continuous fresh air circulation without energy waste.
Setting Up Counter-Current Air Exchange
I design systems where incoming fresh air flows opposite to outgoing stale air, maximizing efficiency through heat exchange. Installing intake vents low on one wall and exhaust vents high on the opposite wall creates this pattern.
This setup recovers heat from exhaust air while ensuring fresh air reaches all areas of your sauna space. Your sauna vent positioning becomes crucial for creating these efficient airflow patterns that birds have perfected over millions of years.

Why Your Sauna Sounds Matter More Than You Think
Your sauna shouldn’t sound like it’s trying to take off. The acoustic environment of your sauna dramatically affects the meditative experience, yet most people completely ignore ventilation noise. I’ve learned that sound control through smart airflow design enhances rather than detracts from peaceful sauna sessions. Nobody wants to meditate to the sound of angry air molecules.
Meeting sauna ventilation requirements doesn’t mean sacrificing the peaceful atmosphere that makes sauna bathing so restorative.
Proper acoustic design complements traditional Finnish sauna etiquette that emphasizes quiet contemplation and peaceful relaxation.
Designing Ventilation That Enhances Peace and Quiet
Creating ventilation systems that support rather than compete with the meditative sauna environment requires some acoustic know-how. I focus on eliminating annoying frequencies while promoting pleasant, natural air movement sounds. The goal is ventilation that feels invisible while maintaining optimal air quality and temperature control throughout your sauna experience.
Your sauna vent design directly impacts whether you’ll hear relaxing airflow or irritating mechanical noise.
Avoiding Frequencies That Drive You Crazy
I once installed a vent that sounded like a tea kettle every time the sauna heated up. Turns out, certain sizes create annoying whistling sounds. Now I avoid 3-4 inch openings like the plague – they hit that perfect pitch that drives you crazy.
There’s actually a simple way to calculate what sizes will cause problems, but here’s my shortcut: avoid vent openings between 3-7 inches if you want peace and quiet. Go smaller (multiple 2-inch vents) or bigger (8+ inches) to stay out of the annoying frequency range.
Creating a proper sauna venting diagram that includes acoustic considerations prevents these problems before construction begins.
| Vent Opening Length | Sound Quality | My Recommendation |
|---|---|---|
| 3.4 inches | Tea kettle whistle | Avoid completely |
| 6.8 inches | Annoying hum | Use with caution |
| 13.6 inches | Neutral | Acceptable |
| 27.2 inches | Pleasant, natural | Great choice |
| 54.4 inches | Very pleasant | Ideal for relaxation |
Acoustic Vent Design Checklist:
- Avoid the 3-7 inch “whistle zone”
- Test with temporary cardboard mock-ups first
- Use smooth, rounded vent edges to prevent turbulence
- Install sound-dampening materials around vent openings
- Test actual sound levels during operation
- Adjust vent sizes based on what you actually hear
Creating Smooth, Silent Airflow
Vent openings with smooth, rounded edges and gradual transitions maintain quiet airflow that doesn’t disturb your relaxation. I use smoke tests to identify and eliminate turbulence-causing sharp edges or sudden direction changes.
This attention to detail prevents whooshing or whistling sounds while maintaining adequate ventilation performance. Your sauna air vent should whisper, not shout.
Making Your Ventilation Sound Natural and Relaxing
Well-designed ventilation systems can actually enhance the natural sauna soundscape rather than competing with wood crackling and gentle air movement. I tune vent openings to create pleasant, low-frequency sounds that mask mechanical noise while contributing to the meditative atmosphere. The goal is proper sauna ventilation that sounds natural rather than mechanical.
Tuning Your Vents for Relaxing White Noise
Experimenting with different vent shapes and sizes helps find combinations that produce white noise sounds in the 20-200 Hz range. These low frequencies are naturally relaxing and meditative, masking any remaining mechanical noise from fans or dampers.
This harmonic tuning transforms necessary ventilation into a positive element of your sauna experience. Your sauna vent becomes an instrument that plays the sound of relaxation.
Creating Multiple Climate Zones in One Space
Think of it like your house – you want different temperatures in different rooms. In a sauna, beginners might want 160°F on the lower bench while sauna veterans are cooking at 200°F up top. With the right vent setup, everyone’s happy in the same space.
Innovation in sauna design continues to evolve, as seen in recent projects such as “California architect Nick Polansky’s Fjord floating sauna, which features two ventilation ducts that help filter air in and out” of separate climate zones within the same floating structure.
This zoned approach perfectly complements outdoor sauna designs that need to accommodate varying weather conditions and user preferences throughout different seasons.
Proper sauna vents placement becomes critical when creating these distinct environmental zones within a single structure.
Independent Climate Control for Different Bench Levels
Installing separate ventilation controls for upper and lower bench areas creates distinct climate zones that serve different purposes. Upper benches require minimal fresh air input to maintain traditional high-heat experiences, while lower areas need substantial fresh air circulation for comfort during cool-down periods. This zoned approach maximizes the versatility of your sauna space.
Each sauna vent operates independently, allowing precise control over temperature gradients that accommodate everyone from beginners to experienced bathers.
Managing Upper Bench Heat for Traditional Experience
Upper benches need only 5-10% of total airflow to maintain the intense heat that defines authentic sauna experiences. I design minimal fresh air input for these areas while ensuring adequate exhaust to prevent dangerous CO2 buildup. This balance preserves traditional high-heat conditions while maintaining safety standards for extended sauna sessions.
Research shows that if your sauna isn’t ventilated or not well ventilated it can be dangerous for your health because the lack of fresh oxygen can cause dizziness and therefore result in an unpleasant sauna experience, making precise airflow control essential even in high-heat zones.
Understanding authentic Finnish sauna practices helps inform these traditional high-heat zone requirements that experienced bathers expect. Proper sauna venting in these areas maintains authenticity while ensuring safety.
Creating Comfortable Cool-Down Zones Below
Lower bench areas require 40-50% of fresh air circulation to provide comfortable spaces for gradual temperature adjustment. I install dedicated intake and exhaust vents that create moderate temperature zones perfect for beginners or cool-down periods. This design accommodates different comfort levels within the same sauna session.
In a recent multi-zone installation, I created a “beginner zone” on the lower bench that maintained 160°F while the upper bench reached 200°F. By directing 45% of fresh air intake to the lower level and installing a separate exhaust sauna vent there, newcomers could enjoy a comfortable introduction to sauna bathing while experienced users maintained their preferred intense heat above.
Smooth Transitions Between Sauna and Changing Areas
Creating gradual temperature and humidity transitions prevents thermal shock and condensation issues in changing spaces. I install intermediate vents that blend sauna air with ambient air at 70-30 ratios, creating comfortable transition zones.
This staged approach eliminates the jarring temperature changes that can disrupt the relaxing sauna experience. Your sauna vent system extends beyond the main chamber to create seamless environmental transitions.
Adapting Your Ventilation to Seasonal Changes
External climate conditions dramatically affect sauna ventilation requirements, and I’ve learned to modify strategies based on seasonal variations. Winter and summer need totally different approaches – preheating cold air and managing humidity keeps your sauna perfect year-round.
Preheating Winter Air to Save Energy
Winter tip: Cold air rushing into your hot sauna feels terrible and wastes energy. I run intake air through buried pipes (like a ground-source heat pump) to warm it up before it hits your sauna. This passive preheating maintains comfort while reducing energy costs during winter operation by 20-30%.
Seasonal Ventilation Adjustment Guide:
Winter Settings (Below 40°F External):
- Close intake vents by about 30%
- Turn on ground preheating system if you have one
- Add 15 extra minutes to preheat time
- Watch for condensation in intake ducts
- Keep slight negative pressure to prevent humid air escaping
Summer Settings (Above 80°F External):
- Open exhaust vents wide (40% more than normal)
- Turn on humidity controls
- Max out intake vents
- Run dehumidifier if you have one
- Check humidity levels regularly
Spring/Fall Settings (40-80°F External):
- Set fans to automatic mode
- Adjust based on temperature difference inside vs outside
- Check system weekly
- Fine-tune based on how often you use it
Managing Summer Humidity Like a Pro
Summer’s the opposite problem – you’re fighting humidity. I use humidity-responsive exhaust controls that automatically increase ventilation rates when external humidity exceeds 70%, preventing oppressive conditions inside your sauna. Sometimes I add desiccant systems to pre-condition incoming air, removing excess moisture before it enters the sauna space.
This active humidity management maintains comfortable conditions even during muggy summer weather.
Optimizing for Mild Spring and Fall Weather
Variable-speed ventilation systems automatically adjust based on temperature differences between internal and external conditions. During mild spring and fall weather, I reduce ventilation rates by 30-40% to maintain heat while preventing stuffiness. This automatic adjustment maintains optimal conditions without you having to constantly fiddle with settings.
How HETKI Sauna Brings These Advanced Concepts to Life
HETKI Sauna’s commitment to authentic Finnish sauna experiences and their use of AI-powered expertise (Sauna Aatos) positions them perfectly to implement these sophisticated ventilation strategies. Their customizable approach allows integration of advanced systems such as heat layer management and natural ventilation patterns while maintaining the aesthetic beauty that defines premium sauna design.
Whether you’re interested in zoned climate control for different user preferences or seasonal adaptation systems that work year-round, HETKI’s premium quality standards ensure proper engineering and long-term reliability. Their understanding that authentic Finnish saunas must work harmoniously with natural environmental cycles makes them ideal partners for implementing these advanced ventilation concepts.
Ready to transform your sauna experience with ventilation that actually enhances rather than detracts from your relaxation? Contact HETKI Sauna to discuss how these advanced concepts can be integrated into your custom sauna design.
Final Thoughts
Look, you don’t need to implement every single one of these ideas. Pick one or two that make sense for your situation. Even small improvements make a huge difference. The goal isn’t to build a NASA-grade sauna – it’s to create a space where you actually want to spend time relaxing.
I’ve shared these ventilation concepts because too many people settle for basic airflow that fights against natural physics instead of working with it. Understanding how heat naturally layers, copying nature’s solutions, managing acoustic environments, and creating multiple climate zones transforms your sauna from a simple hot room into a precisely engineered wellness sanctuary.
The difference between good and exceptional sauna experiences often comes down to ventilation details that most people never consider. When you can measure temperature gradients, work with pressure differences, and tune airflow for both efficiency and peace and quiet, you’re creating something that goes far beyond basic functionality.
These aren’t just theoretical concepts – they’re practical solutions I’ve seen work in real saunas across different climates and usage patterns. Whether you’re dealing with winter preheating challenges or summer humidity management, the principles remain consistent: work with natural forces, learn from what nature already figured out, and never ignore the acoustic environment that defines your meditative experience.